Showing posts with label diy. Show all posts

Magical Fire Starter

The perfect fire starter. Pine Cones!


I was looking for things to do with my nephews and niece when I went back east this last summer. I came across an "activity" of make your own fire starters.

Basically it is dry pine cones, covered in wax--(and a little salt while still sticky).

They work fantastic!


I took old candles that have a tunnel burned out of the center and melted them in a pot of hot water.


Then I poured the melted wax over the pine cones... and hurried... and sprinkled salt.


Don't they look like they have been frosted!


I just put one or two under the logs I am going to light (in the fire place). Strike a match and the magic begins.
I am not sure (exactly) why this works. It has something to do with the wax though. I think it gives the fire some staying power so it will actually burn the pine cones. What ever it is... It works!

Try it!

P.S. I did not actually get to make these with the little guys back east.

New? storage....Luggage

I am sick and tired of the storage "solutions" being damaged or just is not the right size....

Well. I have found a solution. I am taking luggage (solid) and painting them to fit my beauty girl's color scheme. Now we have Polly pocket storage, barbie storage, stuffed animal storage and art supply storage. And all of it fits under her bed. By having all of this luggage taking up all of the room, it helps keep other things from being shoved under the bed.
(After all, that is the meaning of cleaning your room. Push it under the bed and no body will be the wiser. Right?!)

Anyway. On to the process.

  • Find old luggage.

(I happened across this really nice set of Samsonite. The insides were in prime condition. a little wash and good as new.)


  • Lightly sand the out side shell.

(tape off anything you want to keep paint off of. I taped the handles and latches.)

  • use "good" spray paint. I used Krylon.

(several coats will be necessary. I should have primed the luggage first. Then I would have only used One can of the ballet slipper pink. But none the less, I did need two cans of paint for three pieces of luggage.)

Now for the cream. I could not find a crown to save my life and I did not want to have PLAIN luggage storage. It needs a little whimsy. I made a stencil out of laminating film. After I used a good sharp exacto knife and cut away the pieces that would show on the luggage, I taped the stencil into place. This is where I used a different color of paint. Bronze? I think was the color. But It goes great in her room. And Yes! I did have to cut out a second crown stencil because my first one was too big to fit on the train case (which houses the small Polly pocket dolls).

We have filled the suitcase storage and now have some great places to keep her stuff. UNDER the BED! Hooray!!!

Fall Clove Pumpkin


I saw this idea in a magazine a few years ago. But when I went to look for the actual instructions.... they were no where to be found. So I had to do the best I could with my memory.

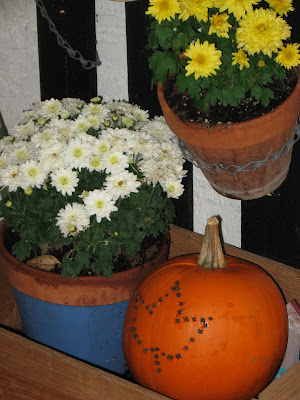
Start with a pumpkin and some whole cloves. You will need a tool to poke holes in the outside of the pumpkin. I used a nut picker (you know the one that is used when you crack a nut and have to fish the flesh out.)


I just poked some holes in the shape of a leaf ( a little sad, I will admit, but it was my attempt at a leaf). Then I inserted the cloves into the holes.

That is it!


I set my pumpkin out on my front porch with my flowers. It creates a lovely spot of color.

Tiffy's Living Room -REDO-

Before - Tiffy's living room.AFTER---TA DA!!!
I painted the walls a lovely chocolate brown with a green stripe.
We found a bunch of picture frames Tiff already had and painted all of them silver to create a collection. We then put baby pictures of each family member in the frames and mounted them along with the silver mirror (which she previously had hanging over the fire place.
Tiff added brown ribbon to the green pillows which helps tie things together. Tiffy had purchased the new sectional before we started to tackle the room, so since we were changing things up anyway, why not go all out.
We decided to use the old entertainment center (which was still quite nice) as a sofa back table.
We also hung a curtain that really accentuated the colors in the room.
We relocated the TV to over the fire place. But before we could put it on top of the mantel, I had to extend the mantel to make it big enough to mount the TV. (Yes I did mount the TV! It is bolted to the mantel)

There are still a few things we are working on. The new entertainment center needs legs and grout on the new tile top. Were are still getting a cord organizer for all of the unsightly electrical. But overall, the room has a new appeal. It is quite inviting and very functional.

Man thing

A few years back I was coming into town to visit my family. I was to stay at my Dad's house, in his office/spare room. He was cleaning out his office with the help of one of my sisters (Summer). I have a reputation for being a little ruthless when it comes to cleaning out stuff. So, Summer was helping with the preparations and had utilized a couple of boxes that were full of items for my dad to sort through. When she told him that he needed to sort this stuff before I got there, he grabbed the two boxes, one under each arm, and went over to the door leading to the garage. He paused in front of the door just long enough to declare "Sanctuary" in a very clear strong voice that carried through the vaulted ceiling. He then headed into the land of the untouchable. (garage)

So, when I saw this sign, I simply had to have it! I mounted it on a nice piece of wood and put mounting brackets on the back so it can be hung--immediately.
This is my Father's Day gift to my dad. I love you Dad!

castle


this is a picture of a mural I worked on with two of my sisters. Tiff and Sundee helped work on the little village. I painted the castle.
This was done in Sundee's little girl's room.

cutsie composition notebook


for a gift for the teacher at the end of the school year, I recovered this composition notebook. It went over really well.

Doll House

This last year for Christmas, my beauty girl asked for a doll house for her Barbies. Well, they were ridiculously expensive. So I called in some help and we remade this book shelf into a doll house.


The response was perfect.


Some of the props were re-purposed. The bathtub was a bread pan, the sink was a candle stick holder (upside down). The dresser up stairs was a jewelry box, kitchen table was a tile glued to a candle holder, rocking chair was a pin cushion. The wall paper was scrapbook papers

Dollar Dress

Now here is something that finally worked!
I bought this sheet at a thrift store on a sale day. I payed one dollar. I then preceded to make a dress out of it. It is a pullover with elastic at the waste. It is all cotton, perfect for Arizona! No zippers or buttons! The only thing that I had to spend extra on was the rick rack on the edge. Other than that, I did not spend anything. I used up supplies I had (thread, elastic)


The sleeves were gathered up (because they were too long) which ended up looking pretty cool. I made a few changes. I moved the rick rack from the neck to the hem line. Here is a close up of the sleeves and hem.

Lil Purse Cards

I came across these wonderful papers that had these little shapes already to be punched out. The paper was double sided, punch-out on one side, pok-a-dots on the other! I could hardly wait to use them. I originally got them for My little beauty's birthday party cards, but I could not stand it. I had to use them as happy birthday cards. When she saw what I was doing, she said, "Mom, maybe we could use these for my birthday party invitations." I said, "What a great Idea!" I got enough sheets to make her invites as well as other cards.

Check out what I made from two of these sheets.
The best part was that these designs were pre cut out! That is the hardest part of card making. Now it is an easy craft idea.

Lil' grey sweater-makeover

This little girls sweater was $3.74. My little girl needed a longer sweater than what she had, but finding one was a trick. I saw that there were many people "fixing" sweaters to meet their needs. So I thought it was a great idea and did it too. It is an easy craft idea too. I took the sweater and sewed two zig-zag stitches down the middle, next to each other. I then cut between the stitches. I added a button and small string to hold it closed. Also, I rolled the sleeve cuff up about three inches.

....... New knee length sweater for my little beauty girl! As she was getting out of the car to go to school, I heard one of the teachers comment to her, "Cute sweater". That did my heart good!


-Tara


Here are some shots of my beauty girl in her sweater.

Zibra purse-change up

Before

I was at the dollar store and saw this little purse. It is not of the highest quality, yet for a buck, who could resist. I did not want short handles, so I cut them. I was just going to re-do the strap, but, decided that I needed an outside pocket and some loops for keys and anything else I NEEDED to hang from the bag. It is a great size, light weight and I am not worried about ruining it! If you have a sewing machine and a scrap or two of fabric, you can turn a non-individual into a one of a kind! I was able to make the change in about 45 to 50 mins.

After


-Tara

Chair - refreshed

I found this chair at a thrift shore. It was really sturdy and comfortable. My Big-ol-boy needed a chair for his desk in his room. So I unscrewed the seat from the bottom, tossed the rancid fabric and replaced. I used leftover batting for the "cushy" part and denim from an old pair of jeans. I turned out great. 6 bucks for the whole project, baby! The wood color and denim go with the color scheme of his room and best of all, my big-ol-boy loves it!


Birds in Paris


I found this paper at a paper store in DownTown Mesa. Sadly, the store went out of business in the fall.
This paper was the inspiration for my Beauty girl's room. A warm pink and milk chocolate brown. Vintage feel with birds and flowers.


The frame was a thrift store find ($3.99).
The paper ($1.50)
The glass birds were after Christmas ornaments 90% off ($0.39 each)
Flowers (about $0.20)

The other embellishments were things I already had.

Re-wire (steps, not instructions)


First things first. You have to have an ulgy old lamp to fix.

I removed the outer glass and the chain attachment. I then opened the compartment where the wiring was. (take pictures as you go, so you can reassemble the parts)

Save the wire nuts when you remove them. It is a pain to find out you lost that little yellow screw on thing (nut). I untwisted the wires that were connected. I actually drew a picture of what wires went to which part, a little diagram, so I would get it right. A picture is worth a thousand words, but a diagram has a few very helpful words just where you need them.

I had to pull the old wire out of the lamp. I mean PULL!

Then I had to thread the new wire through the opposite way I took the old wire out and reassemble and connect the wires again.

After reattaching the outer casing I add a two pronged plug. Make sure to follow instructions. I bought the wrong plug for the wire I had. I had silver wire and got plugs for brass wire only. Not good, so I went and got the right kind of plug..for silver (aluminum, I think) wire.

These are not really instructions. In fact they are more of a proof that I did rewire the lamp. I googled "How to rewire a lamp" and got all the info I needed.

I am doing as my mother admonished. Finish!