The perfect fire starter. Pine Cones!
I was looking for things to do with my nephews and niece when I went back east this last summer. I came across an "activity" of make your own fire starters.
Basically it is dry pine cones, covered in wax--(and a little salt while still sticky).
They work fantastic!
I took old candles that have a tunnel burned out of the center and melted them in a pot of hot water.
Then I poured the melted wax over the pine cones... and hurried... and sprinkled salt.
Don't they look like they have been frosted!
I just put one or two under the logs I am going to light (in the fire place). Strike a match and the magic begins.
I am not sure (exactly) why this works. It has something to do with the wax though. I think it gives the fire some staying power so it will actually burn the pine cones. What ever it is... It works!
Try it!
P.S. I did not actually get to make these with the little guys back east.
New? storage....Luggage
I am sick and tired of the storage "solutions" being damaged or just is not the right size....
Well. I have found a solution. I am taking luggage (solid) and painting them to fit my beauty girl's color scheme. Now we have Polly pocket storage, barbie storage, stuffed animal storage and art supply storage. And all of it fits under her bed. By having all of this luggage taking up all of the room, it helps keep other things from being shoved under the bed.
(After all, that is the meaning of cleaning your room. Push it under the bed and no body will be the wiser. Right?!)
Anyway. On to the process.
(I happened across this really nice set of Samsonite. The insides were in prime condition. a little wash and good as new.)
(tape off anything you want to keep paint off of. I taped the handles and latches.)
(several coats will be necessary. I should have primed the luggage first. Then I would have only used One can of the ballet slipper pink. But none the less, I did need two cans of paint for three pieces of luggage.)
Now for the cream. I could not find a crown to save my life and I did not want to have PLAIN luggage storage. It needs a little whimsy. I made a stencil out of laminating film. After I used a good sharp exacto knife and cut away the pieces that would show on the luggage, I taped the stencil into place. This is where I used a different color of paint. Bronze? I think was the color. But It goes great in her room. And Yes! I did have to cut out a second crown stencil because my first one was too big to fit on the train case (which houses the small Polly pocket dolls).
We have filled the suitcase storage and now have some great places to keep her stuff. UNDER the BED! Hooray!!!
Well. I have found a solution. I am taking luggage (solid) and painting them to fit my beauty girl's color scheme. Now we have Polly pocket storage, barbie storage, stuffed animal storage and art supply storage. And all of it fits under her bed. By having all of this luggage taking up all of the room, it helps keep other things from being shoved under the bed.
(After all, that is the meaning of cleaning your room. Push it under the bed and no body will be the wiser. Right?!)
Anyway. On to the process.
- Find old luggage.
(I happened across this really nice set of Samsonite. The insides were in prime condition. a little wash and good as new.)
- Lightly sand the out side shell.
(tape off anything you want to keep paint off of. I taped the handles and latches.)
- use "good" spray paint. I used Krylon.
(several coats will be necessary. I should have primed the luggage first. Then I would have only used One can of the ballet slipper pink. But none the less, I did need two cans of paint for three pieces of luggage.)
Now for the cream. I could not find a crown to save my life and I did not want to have PLAIN luggage storage. It needs a little whimsy. I made a stencil out of laminating film. After I used a good sharp exacto knife and cut away the pieces that would show on the luggage, I taped the stencil into place. This is where I used a different color of paint. Bronze? I think was the color. But It goes great in her room. And Yes! I did have to cut out a second crown stencil because my first one was too big to fit on the train case (which houses the small Polly pocket dolls).
We have filled the suitcase storage and now have some great places to keep her stuff. UNDER the BED! Hooray!!!
Fall Clove Pumpkin
I saw this idea in a magazine a few years ago. But when I went to look for the actual instructions.... they were no where to be found. So I had to do the best I could with my memory.
Start with a pumpkin and some whole cloves. You will need a tool to poke holes in the outside of the pumpkin. I used a nut picker (you know the one that is used when you crack a nut and have to fish the flesh out.)
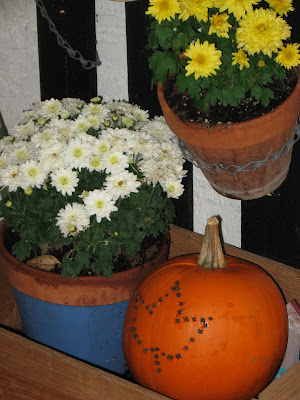
I just poked some holes in the shape of a leaf ( a little sad, I will admit, but it was my attempt at a leaf). Then I inserted the cloves into the holes.
That is it!
I set my pumpkin out on my front porch with my flowers. It creates a lovely spot of color.
Party- butterfly Pinata
A few year ago, my Beauty Girl wanted a pinata at her Birhtday Party. Well I just could not spend the money on the one she wanted ($18 plus). I thought, I can make that!
Well I did make it and it was perfect!
The girls loved swinging at the thing and had a grand time diving after the candy as it fell!
There is a word of caution to this tale. Unless the Pinata needs to match your birthday theme exactly, it would have been better to just buy the thing! The supplies were cheep, but the labor was intensive! The moral of this tale is Lots of time, no money...This is the answer! No time, some money... Just buy it!
Lets Play House
OK... It is a little uncanny that one of my sisters and I are so similar. Well, here is yet another example of this! I had drawn up plans for a PVC play house for my Beauty Girl a few years ago. And what to my wondering eyes should appear but a completed project of a pvc house on HER blog! Anyway, it got me all inspired to actually put my plans into action. I did look at the plans she used, which were almost the same as mine, but I added a door to the front. (My Beauty Girl is a tad accident prone and would have tripped over the pvc pipe in the entrance.) And for the sides, I put in holes for windows. This is two fold, One there is better ventilation and the breezes do not tear apart the whole thing. Two, I can check up on play more easily. That is my job as the MOM.
I also recycled! I used left over pvc from my Dad and used old sheets that were going to be donated. But viola, I found a use for them. I attached hook and loop (Velcro) to the walls and sides for easy removal of the walls. This is an outside thing you know (but it is under the back porch). For the top, I used a queen sized fitted sheet. I just popped it on and there it is! I did have to buy the connection pieces and one more piece of pipe. I think I spent around $15-$20.
We did put a few other things in there. An old spool for wire was painted pink and is now a table. There is a tin mail box (painted pink) outside the door. Also, an indoor-outdoor rug is under the house. That is just to make it a little nicer for my Beauty Girl!
Take a look. Tell me what you think!
Purse from scratch
Here is my newest purse- from scratch.
I used some leather like material I got several years ago (and never used) for the outside. The inside is made from the pants pocked of an old pair of jeans. For the flower, I cut circular shapes with indentations. Then I burned the edges to give it a darker brown trim. The hardware are clasps from a pair of overalls and the hooks of a worn out purse.
The Peacock on the front was a broken broach that I sewed on.
This has turned out to be a great little purse.
Pottery- Date night
I decided that for date night we needed to do something DIFFERENT! I found this pottery class on a Saturday night and you were to bring a DATE. So I signed up me and my man! We had so much fun. My man was really frustrated at first because the wheel flung mud all over his nice black pants. But, since he was already dirty, he really got into it! He made 3 items that were keepers (and two more that broke apart on the wheel). I only made two items (plus one that did not survive the wheel) So we got a total of 5 pottery items.
Here they are. I put decorations on my two projects,
a dragonfly and flowers. The others were painted solid colors.
I highly recommend this to anyone. We really had a good time. And it was outside of the norm!
Here they are. I put decorations on my two projects,
a dragonfly and flowers. The others were painted solid colors.
I highly recommend this to anyone. We really had a good time. And it was outside of the norm!
Tiffy's Living Room -REDO-
Before - Tiffy's living room.AFTER---TA DA!!!
I painted the walls a lovely chocolate brown with a green stripe.
We found a bunch of picture frames Tiff already had and painted all of them silver to create a collection. We then put baby pictures of each family member in the frames and mounted them along with the silver mirror (which she previously had hanging over the fire place.
Tiff added brown ribbon to the green pillows which helps tie things together. Tiffy had purchased the new sectional before we started to tackle the room, so since we were changing things up anyway, why not go all out.
We decided to use the old entertainment center (which was still quite nice) as a sofa back table.Butterfly, butterfly
Butterfly, butterfly, flit and fly!
Man thing
A few years back I was coming into town to visit my family. I was to stay at my Dad's house, in his office/spare room. He was cleaning out his office with the help of one of my sisters (Summer). I have a reputation for being a little ruthless when it comes to cleaning out stuff. So, Summer was helping with the preparations and had utilized a couple of boxes that were full of items for my dad to sort through. When she told him that he needed to sort this stuff before I got there, he grabbed the two boxes, one under each arm, and went over to the door leading to the garage. He paused in front of the door just long enough to declare "Sanctuary" in a very clear strong voice that carried through the vaulted ceiling. He then headed into the land of the untouchable. (garage)
So, when I saw this sign, I simply had to have it! I mounted it on a nice piece of wood and put mounting brackets on the back so it can be hung--immediately.
This is my Father's Day gift to my dad. I love you Dad!
So, when I saw this sign, I simply had to have it! I mounted it on a nice piece of wood and put mounting brackets on the back so it can be hung--immediately.
This is my Father's Day gift to my dad. I love you Dad!
castle
cutsie composition notebook
New York Girls Trip Memory book- Part 1
Subscribe to:
Posts (Atom)